This past week I got to try my hand at using some of Smooth on's expanding foam. Pretty great stuff. Much lighter and stronger than I expected.
Since I couldn't find the answers to these questions on the web I figured I would put them out there.
Foam it won't stick to rebound 25. We didn't even have to use a release agent.
Foam it WILL stick to plaster. We got around this by wrapping our plaster piece in cling wrap. The cling wrap didn't completely come off of the cured foam, but it wasn't that big a problem.
Hot glue will stick to Foam it pretty well.
Tuesday, November 30, 2010
Awesome sauce
Had a great time down at the Texas Renaissance Fair this past weekend. I went as Ash again and my friend went as a steampunk fox. We even managed to track down the guy who gave us the idea in the first place.


Much awesomeness was had :)


Much awesomeness was had :)
Monday, November 15, 2010
A query
I've put up a poll on the side of the page. I've been kicking around the idea of seeing if I could create a set of modular steampunk pieces. Sort of like steampunk legos for rapidly assembling steampunk costume pieces. For people either to use straight as they are or as a jumping off point for their own designs.
Would you be interested in such a thing? Vote now!
Would you be interested in such a thing? Vote now!
Friday, November 12, 2010
Tutorial: Making a lifecast of a face using body double rubber
So, for whatever reason you need / want to have a cast of your ( or a friend's) face. In the days before now the only real option was to use something like dental alginate. Alginate forms fairly rapidly into a hard rubber like mold, but it's not terribly durable and generally wont last beyond a single casting. Smooth on has a skin safe rubber that is available now. While it does cost nearly three times as much, the rubber lifecasting mold is durable and will last for many castings.
The process isn't terribly complicated and can be completed in about an hour to an hour and a half. The temperature in the area you do the work in needs to be at or around 70 degrees Fahrenheit. If the temperature is very far below it the rubber wont set properly or take a terribly long time doing it. If the termperature rises above 75 then your already limited working time will be reduced.
This process is not for the claustrophobic.
You can get body double from smooth on here
What you'll need
A friend (or two)
An area to work in that is around 70 degrees (the rubber does not produce any fumes so ventilation isnt a problem)
Several paper towels
some small disposable cups
some popsicle sticks (Really, anything that you can use to mix and apply the rubber with will work, but it makes quite a mess so choose something disposable unless you are prepared to clean off quite a bit of rubber)
a few cotton swabs
a shower cap (The idea is to protect the subjects hair, anything that will keep the rubber from making contact with the hair will work)
Enough body double rubber to coat the face
release cream (Vaseline can be used, but I recommend the release cream that smooth on offers)
Plaster bandages
scissors
a bowl
a clock or timer
(Alternatively, smooth-on sells a body double kit that contains the basic components, ruhber, and a relase cream for roughly $75. It includes the plaster bandages, a few cups and popsicle sticks, release cream, enough body double rubber to coat a face (and a little extra), and a tutorial dvd (this tutorial covers many of the things it contains, but also shares a little of the extra stuff we have learned while using body double))
Step 0: Preperation
At this point you should have all your materials gathered together and readily accessible, once the process starts you won't want to run all over the house to collect them. You should have the subject take a shower or at least wash their face and hair. The subject should also be freshly shaven, the body double rubber will pick up any detail including pores and hairs. They should be dressed comfortably, make sure they are wearing a shirt they don't mind losing (so far we have never lost a shirt to this process, but just in case)
Warning : This rubber will lock firmly onto hair if you do not coat it in a release cream.
After you have your materials and your subject is prepared go to the area you will be working in. Have your subject lie down and make sure they are comfortable. Get them a pillow or a blanket to lie on to make them comfortable if need be, they will be lieing in that spot for roughly an hour so make sure they are perfectly comfortable.
Underneath their head and neck make sure to put down a few sheets of paper towels, the rubber has a tendency to run and will bond with fabric.
 So, now we have our subject on the ground and in a comfortable spot. All of our materials are within reach and its not to hot or too cold. Our subject has shaved in preparation for the process and we're both ready.
You ready subject?

I sure hope so.
Step 1: Release agent.
Either using the release cream that comes with the body double kit or Vaseline the subject needs to coat his face thoroughly.

Make sure that the eyebrows are thoroughly covered, It also doesn't hurt to coat the edge of the hairline.

Not quite

A little more

Make sure the eyelids and more importantly the eyelashes are covered well.
Warning again: This rubber will attach itself firmly to any hair not coated in release cream.

There we go. Now our subject has totally coated their face, making sure to get the eyebrows and eyelashes well covered. The coating on the skin should be a light sheen. Any place where you can see an glob or line of release cream will transfer to the mold. So while you need to really grease up your eyebrows, don't go overboard on the skin.
So up to this point we've gathered out materials and made our subject comfortable, they have totally coated their face in release cream. They should also put on their shower cap / hair protector. (This part of this step actually got skipped in the picture series and rubber got into the subjects hair and was a royal pain to get out.) I strongly encourage you not to skip putting on a shower cap or other hair protector.
Step 2: Rubber round 1
Now that the subject is comfortable and greasier than anyone has a right to be lets get down to the nitty gritty.
Grab 3 cups and 3 popsicle sticks. (The kit only comes with two popsicle sticks, which is fine you'll just need to wipe one stick off after each round of rubber)
The rubber is a two part compound. There is a part A and a part B. One is bright pink and the other blue. Shake the cans thoroughly before you start working with them. Working at a temperature of around 70 degrees you will have approximately 5 minutes of working time once the pink meets the blue so you will need to work in relatively small batches. If you are using small disposable cups like the ones that come with the kit pour a full cup of each color then combine them into a regular size disposable cup. If you are working only with full size disposable cups (like your standard plastic picnic cups) then pour roughly 1/3 of a cup of both colors out, then combine them in a third cup.
Make sure you don't cross contaminate your rubber. Never place anything that has been in one color rubber into the other color.
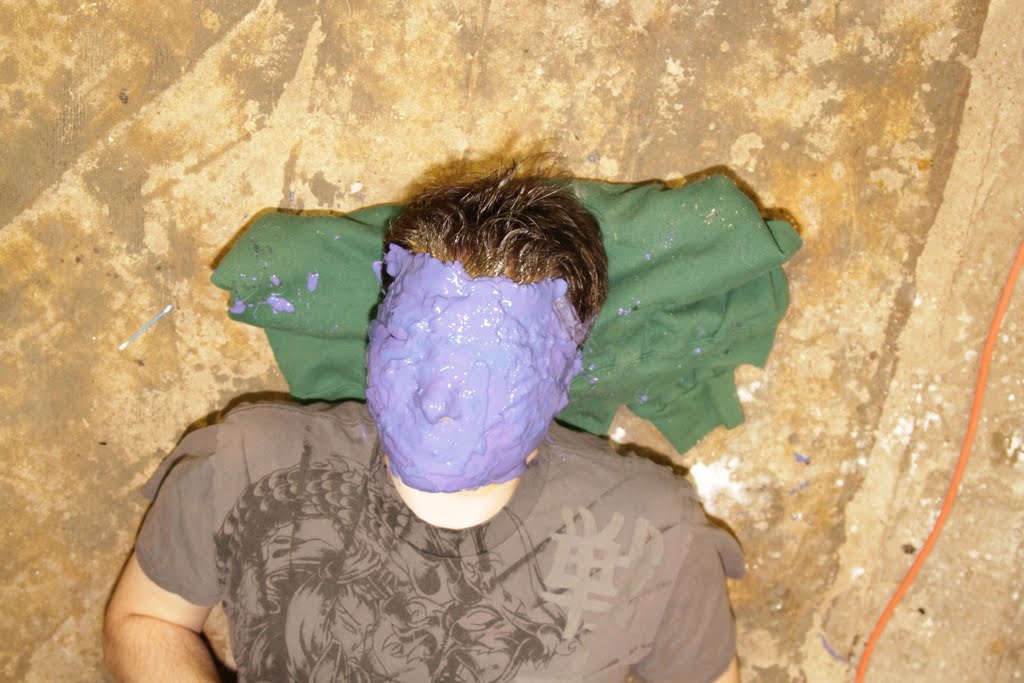
Now that you've measured out your rubber and poured it into a third cup for mixing grab a popsicle stick and start stirring. The pink and blue will blend together as you stir to form a deep purple. Thats the reason the rubber starts off such bright colors, so that you know when its properly mixed. Make sure to scrape down the sides of your cup and keep mixing until the whole cup is a uniform purple color. It doesnt have to be super perfect, you should spend no more than thirty seconds stirring, because you only have around 5 minutes of working time from when the blue and pink hit.
Start applying the rubber to your subject.

As you brush the rubber on with the popsicle stick apply light pressure to the rubber. Especially for this first coat you want to avoid letting air bubbles end up against the skin. Just concentrate on getting a smooth layer the first go round. I generally go around the border of the mask first, to set a border for myself and because the rubber will run some and it makes it harder to get a smooth layer if you are applying over drips and streams from rubber higher on the face.
When working around the eyes be gentle and always stroke away from the nose. This applies to working with the eyebrows as well. The reason for this is if you stroke towards the nose you will stand the hair and eyelashes up, making them more likely to get locked into the rubber.
Your first batch of rubber probably wont coat the entire face. If you are quick, and I mean if you immediately go and do it, you can make up a second batch and finish the face. As you are applying the second coat you are working against the clock. The problem is that once the already applied rubber reaches a certain point it will be stiff enough that it will peel off of the subject's face as you try to apply more rubber because it wants to stick to rubber more than the subject's face, if it gets to this point STOP. You may waste what rubber you've already mixed up, but its better than pulling all the rubber off your subject and starting over. The kit comes with slightly more rubber than you need so it shouldn't be a problem in the long run.

While the face, eyes, and mouth shouldn't be much of a problem, leaving the nose open for your subject can be a little tricky. There are a few tricks to make it easier. First, wait until you are getting close to being out of rubber to go for the nose. Since the rubber has been reacting longer it will be thicker and less likely to try and run into the nostrils. Second, before you apply rubber to the nose ask your subject to take a deep breath, after you have applied the rubber have them exhale, this will help to keep their airway clear. Third, Should the rubber make a run for their nose have your cotton swabs at the ready, and get it out quick. Fourth, always use small dabs for the end of the nose, to minimize having a lot of rubber trying to run where you don't intend it to.
Alright, so at the end of this phase your subject should have at least part of his face covered in rubber, if you chose not to try and mix up a second batch then set your timer and just repeat back to this step.
Step 3 Rubber round 2
So now that you've coated your subject's face, set a timer for 20 minutes.
This will give the first batch of rubber enough time to really set up. This will keep it from peeling off the face.
Keep your subject company, it can get kind of weird being cut off in the mask.
After the twenty minutes are up feel the mask, check for any holes and try and note areas where the mask feels thin. The mold rubber is fairly tough but you want the mask to be at least 1/4 inch thick (thicker around the eyes and nose). Ask the subject to point out any areas they feel are to thin.
Mix your second batch of rubber up (again its a 1 to 1 ratio). This go round you want to really fill the depressions of the eyes and make sure the nose is good and thick. Make sure you're careful around the nostrils. (At this point you probably couldn't rip the mask off if you wanted, and the subject wants to keep breathing. Use small dabs, keep your cotton swab handy and make sure to get them to exhale after you get close to their nostrils)

After your done the depressions of the eyes should be mostly filled in. The mask should be at least a 1/4 inch thick on the cheeks, forehead, chin, and under the chin. Make sure the bridge of the nose is well coated. The area around the nostrils will be the thinnest spot because building it up there poses too much of a risk to the subject.
Set your timer for another 20 minutes
Step 4 plaster bandages
Get your bowl and fill it with mildly warm water. Before you get started cut your plaster bandages into strips. The size really doesn't matter much.

Go around the whole face, making sure to really reinforce under the chin and around the edges of the mask. Just as with the rubber your subject won't appreciate letting plaster or water run up their nose, so be careful and have them exhale to blow any water away. As you get close to being finished reinforce the nose. The easiest way is to take one of your bandage strips and to fold it over and over until its about as wide as the bridge of their nose, then wrap it from the bridge of their nose underneath their septum ( where the nostrils are). The plaster mask doesn't have to look pretty, it's purpose is to support the rubber mold so that it doesn't deform when you use it to cast other materials.
Set your timer for 15 minutes, reassure your subject that your almost done.
Step 5 removal
If the plaster mask seems to be firm and fairly rigid it's time to get back to the real world.
First let's remove the plaster mask. This will be easier if you help your subject into a sitting position. They will probably be slightly wobbly from laying still so long.

Or in my case a zombie. Gently wiggle the mask from side to side, it will be stuck to the rubber, but the bond should be fairly weak. After some light wiggling you should be able to pull the plaster mask off gently. Set it aside, while it's still damp it will be fairly easy to damage.

Now to get the rubber off. Have your subject use their fingers to work under the edge of the mask starting underneath their chin. Have them take their time. Areas with the proper amount of release cream will come off with little effort. Any areas that didn't get much release cream will stick pretty good and will have to be peeled off like a band-aid. Any hair that wasn't coated will be pulled out. (If the rubber does manage to get into a significant amount of hair the easiest way to remove it without removing ALL of the hair is to trim the mold around the affected hair and then have the subject massage the rubber off while in the shower, but this is not guaranteed to work PROTECT YOUR HAIR )
After you have pulled the mold off of your subject they are probably going to want to shower. While they are doing that you can make the final touches. Look the mold over, make note of any holes (including the nostrils), and any bubbles that might have been trapped against the skin. Mix up a very small batch of rubber and plug the holes in the nose and any other holes that might exist. Next fill in any large bubbles that might have been in the mold. Before the rubber hardens make sure to wipe away as much of the excess as you can (so that you don't lose any more details in the mold than you have to)
After the mold has hardened for the final time and the plaster mother mold is hard your face mold is ready for casting. Body double rubber can be used to cast a wide variety of materials and should last for years to come.
Make sure you use a mold release when you cast into the mold!
Between this tutorial and the included dvd (which can also be accessed on youtube here) the process should be a fairly straightforward and simple process. Go nuts!
The process isn't terribly complicated and can be completed in about an hour to an hour and a half. The temperature in the area you do the work in needs to be at or around 70 degrees Fahrenheit. If the temperature is very far below it the rubber wont set properly or take a terribly long time doing it. If the termperature rises above 75 then your already limited working time will be reduced.
This process is not for the claustrophobic.
You can get body double from smooth on here
What you'll need
A friend (or two)
An area to work in that is around 70 degrees (the rubber does not produce any fumes so ventilation isnt a problem)
Several paper towels
some small disposable cups
some popsicle sticks (Really, anything that you can use to mix and apply the rubber with will work, but it makes quite a mess so choose something disposable unless you are prepared to clean off quite a bit of rubber)
a few cotton swabs
a shower cap (The idea is to protect the subjects hair, anything that will keep the rubber from making contact with the hair will work)
Enough body double rubber to coat the face
release cream (Vaseline can be used, but I recommend the release cream that smooth on offers)
Plaster bandages
scissors
a bowl
a clock or timer
(Alternatively, smooth-on sells a body double kit that contains the basic components, ruhber, and a relase cream for roughly $75. It includes the plaster bandages, a few cups and popsicle sticks, release cream, enough body double rubber to coat a face (and a little extra), and a tutorial dvd (this tutorial covers many of the things it contains, but also shares a little of the extra stuff we have learned while using body double))
Step 0: Preperation
At this point you should have all your materials gathered together and readily accessible, once the process starts you won't want to run all over the house to collect them. You should have the subject take a shower or at least wash their face and hair. The subject should also be freshly shaven, the body double rubber will pick up any detail including pores and hairs. They should be dressed comfortably, make sure they are wearing a shirt they don't mind losing (so far we have never lost a shirt to this process, but just in case)
Warning : This rubber will lock firmly onto hair if you do not coat it in a release cream.
After you have your materials and your subject is prepared go to the area you will be working in. Have your subject lie down and make sure they are comfortable. Get them a pillow or a blanket to lie on to make them comfortable if need be, they will be lieing in that spot for roughly an hour so make sure they are perfectly comfortable.
Underneath their head and neck make sure to put down a few sheets of paper towels, the rubber has a tendency to run and will bond with fabric.

You ready subject?

I sure hope so.
Step 1: Release agent.
Either using the release cream that comes with the body double kit or Vaseline the subject needs to coat his face thoroughly.

Make sure that the eyebrows are thoroughly covered, It also doesn't hurt to coat the edge of the hairline.

Not quite

A little more

Make sure the eyelids and more importantly the eyelashes are covered well.
Warning again: This rubber will attach itself firmly to any hair not coated in release cream.

There we go. Now our subject has totally coated their face, making sure to get the eyebrows and eyelashes well covered. The coating on the skin should be a light sheen. Any place where you can see an glob or line of release cream will transfer to the mold. So while you need to really grease up your eyebrows, don't go overboard on the skin.
So up to this point we've gathered out materials and made our subject comfortable, they have totally coated their face in release cream. They should also put on their shower cap / hair protector. (This part of this step actually got skipped in the picture series and rubber got into the subjects hair and was a royal pain to get out.) I strongly encourage you not to skip putting on a shower cap or other hair protector.
Step 2: Rubber round 1
Now that the subject is comfortable and greasier than anyone has a right to be lets get down to the nitty gritty.
Grab 3 cups and 3 popsicle sticks. (The kit only comes with two popsicle sticks, which is fine you'll just need to wipe one stick off after each round of rubber)
The rubber is a two part compound. There is a part A and a part B. One is bright pink and the other blue. Shake the cans thoroughly before you start working with them. Working at a temperature of around 70 degrees you will have approximately 5 minutes of working time once the pink meets the blue so you will need to work in relatively small batches. If you are using small disposable cups like the ones that come with the kit pour a full cup of each color then combine them into a regular size disposable cup. If you are working only with full size disposable cups (like your standard plastic picnic cups) then pour roughly 1/3 of a cup of both colors out, then combine them in a third cup.
Make sure you don't cross contaminate your rubber. Never place anything that has been in one color rubber into the other color.
Now that you've measured out your rubber and poured it into a third cup for mixing grab a popsicle stick and start stirring. The pink and blue will blend together as you stir to form a deep purple. Thats the reason the rubber starts off such bright colors, so that you know when its properly mixed. Make sure to scrape down the sides of your cup and keep mixing until the whole cup is a uniform purple color. It doesnt have to be super perfect, you should spend no more than thirty seconds stirring, because you only have around 5 minutes of working time from when the blue and pink hit.
Start applying the rubber to your subject.

As you brush the rubber on with the popsicle stick apply light pressure to the rubber. Especially for this first coat you want to avoid letting air bubbles end up against the skin. Just concentrate on getting a smooth layer the first go round. I generally go around the border of the mask first, to set a border for myself and because the rubber will run some and it makes it harder to get a smooth layer if you are applying over drips and streams from rubber higher on the face.
When working around the eyes be gentle and always stroke away from the nose. This applies to working with the eyebrows as well. The reason for this is if you stroke towards the nose you will stand the hair and eyelashes up, making them more likely to get locked into the rubber.
Your first batch of rubber probably wont coat the entire face. If you are quick, and I mean if you immediately go and do it, you can make up a second batch and finish the face. As you are applying the second coat you are working against the clock. The problem is that once the already applied rubber reaches a certain point it will be stiff enough that it will peel off of the subject's face as you try to apply more rubber because it wants to stick to rubber more than the subject's face, if it gets to this point STOP. You may waste what rubber you've already mixed up, but its better than pulling all the rubber off your subject and starting over. The kit comes with slightly more rubber than you need so it shouldn't be a problem in the long run.

While the face, eyes, and mouth shouldn't be much of a problem, leaving the nose open for your subject can be a little tricky. There are a few tricks to make it easier. First, wait until you are getting close to being out of rubber to go for the nose. Since the rubber has been reacting longer it will be thicker and less likely to try and run into the nostrils. Second, before you apply rubber to the nose ask your subject to take a deep breath, after you have applied the rubber have them exhale, this will help to keep their airway clear. Third, Should the rubber make a run for their nose have your cotton swabs at the ready, and get it out quick. Fourth, always use small dabs for the end of the nose, to minimize having a lot of rubber trying to run where you don't intend it to.
Alright, so at the end of this phase your subject should have at least part of his face covered in rubber, if you chose not to try and mix up a second batch then set your timer and just repeat back to this step.
Step 3 Rubber round 2
So now that you've coated your subject's face, set a timer for 20 minutes.
This will give the first batch of rubber enough time to really set up. This will keep it from peeling off the face.
Keep your subject company, it can get kind of weird being cut off in the mask.
After the twenty minutes are up feel the mask, check for any holes and try and note areas where the mask feels thin. The mold rubber is fairly tough but you want the mask to be at least 1/4 inch thick (thicker around the eyes and nose). Ask the subject to point out any areas they feel are to thin.
Mix your second batch of rubber up (again its a 1 to 1 ratio). This go round you want to really fill the depressions of the eyes and make sure the nose is good and thick. Make sure you're careful around the nostrils. (At this point you probably couldn't rip the mask off if you wanted, and the subject wants to keep breathing. Use small dabs, keep your cotton swab handy and make sure to get them to exhale after you get close to their nostrils)
After your done the depressions of the eyes should be mostly filled in. The mask should be at least a 1/4 inch thick on the cheeks, forehead, chin, and under the chin. Make sure the bridge of the nose is well coated. The area around the nostrils will be the thinnest spot because building it up there poses too much of a risk to the subject.
Set your timer for another 20 minutes
Step 4 plaster bandages
Get your bowl and fill it with mildly warm water. Before you get started cut your plaster bandages into strips. The size really doesn't matter much.

Go around the whole face, making sure to really reinforce under the chin and around the edges of the mask. Just as with the rubber your subject won't appreciate letting plaster or water run up their nose, so be careful and have them exhale to blow any water away. As you get close to being finished reinforce the nose. The easiest way is to take one of your bandage strips and to fold it over and over until its about as wide as the bridge of their nose, then wrap it from the bridge of their nose underneath their septum ( where the nostrils are). The plaster mask doesn't have to look pretty, it's purpose is to support the rubber mold so that it doesn't deform when you use it to cast other materials.
Set your timer for 15 minutes, reassure your subject that your almost done.
Step 5 removal
If the plaster mask seems to be firm and fairly rigid it's time to get back to the real world.
First let's remove the plaster mask. This will be easier if you help your subject into a sitting position. They will probably be slightly wobbly from laying still so long.

Or in my case a zombie. Gently wiggle the mask from side to side, it will be stuck to the rubber, but the bond should be fairly weak. After some light wiggling you should be able to pull the plaster mask off gently. Set it aside, while it's still damp it will be fairly easy to damage.

Now to get the rubber off. Have your subject use their fingers to work under the edge of the mask starting underneath their chin. Have them take their time. Areas with the proper amount of release cream will come off with little effort. Any areas that didn't get much release cream will stick pretty good and will have to be peeled off like a band-aid. Any hair that wasn't coated will be pulled out. (If the rubber does manage to get into a significant amount of hair the easiest way to remove it without removing ALL of the hair is to trim the mold around the affected hair and then have the subject massage the rubber off while in the shower, but this is not guaranteed to work PROTECT YOUR HAIR )
After you have pulled the mold off of your subject they are probably going to want to shower. While they are doing that you can make the final touches. Look the mold over, make note of any holes (including the nostrils), and any bubbles that might have been trapped against the skin. Mix up a very small batch of rubber and plug the holes in the nose and any other holes that might exist. Next fill in any large bubbles that might have been in the mold. Before the rubber hardens make sure to wipe away as much of the excess as you can (so that you don't lose any more details in the mold than you have to)
After the mold has hardened for the final time and the plaster mother mold is hard your face mold is ready for casting. Body double rubber can be used to cast a wide variety of materials and should last for years to come.
Make sure you use a mold release when you cast into the mold!
Between this tutorial and the included dvd (which can also be accessed on youtube here) the process should be a fairly straightforward and simple process. Go nuts!
Tuesday, November 9, 2010

Monday, November 8, 2010
If you saw ash from fantasic mr fox this halloween at the Texas Ren fair...

That was me :)
I'll be attending the Texas ren faire in plantersville one more time this year on the 27th of November.
Maybe I'll see you there!
Sunday, November 7, 2010
Tutorials coming soon
With any luck I should have a few tutorials coming up in the next week or two. I'm going to be helping a friend make a lifecast of his face and I'll be documenting the process.
Till then I've been watching a lot of South Park on netflix, I've missed so many of them.
Till then I've been watching a lot of South Park on netflix, I've missed so many of them.
Friday, November 5, 2010
The second costume part two
In the last post I gave a short overview of how I created the whackbat for my Fantastic Mr. Fox costume.
The next big challenge was going to be the head. For the furrier among you I was going to have to create, in essence, a partial fursuit from scratch in about a week and a half.
The clothes and cape weren't a terrible problem. Ash wears all white, so a pair of white painter's pants and a white long sleeve shirt took care of most of it. I wasn't able to find a white beach towel in my local stores in october so I ordered it through amazon.com. Since I'm terrible at sewing I also purchased my tail through an artist from canada (beetlecat).
After making a quick cut to my beach towel the cape was ready.

Which basically left the head. Now out of most of the fursuits that I see the heads are oversized and slightly cartoony, which wasn't the direction that I wanted to go. Since I wanted to create something fairly thin I didn't think that foam would hold up. So I went with a prosthetics rubber.
The first step was to create a lifecast of my face. I have previously done lifecasting with dental alginate, and while it works I would highly reccomend smooth-on's skin safe lifecasting rubber. After applying some of the included face release cream we got started.


An hour later and I had a fairly durable replica of my ugly mug. Unlike the dental alginate molds that I've created before, this rubber lifecast mold should last for several years.

Just a couple of hours later I had a base to sculpt on.
Unfortunately I didn't take all that many shots of the next phase of the process as at the time I still hadn't decided to restart this blog.
The rubber that I choose to work with (smooth-on's ecoflex 0030) was to soft to create the entire mask out of without having the muzzle droop down. So the first thing I did was to cast an upper and lower jaw out of a light weight plastic (smooth-on's featherlite).

Using smooth-on's (can you tell I'm a fan of their materials?) Rebound 25 mold making rubber I made molds of the upper and lower parts. Then a mold of the overall face shape into which I placed the plastic parts I had previously cast. I screwed up pretty good on the last step and forgot to spray down the final mold with a mold release. The ecoflex bonded to the mold and I had to cut the mold apart with an Exacto knife.
Finally though we got to putting fur onto the head. I got my fur from mendel's (mendel's online store) Unfortunately most things wont stick directly to the rubber so I used the glue for attaching the mask to my face to attach the fur (smooth-on skintite)

This turned out to work fairly great.
For the back of the head I created a simple mold out of masking tape and used some moldable wire mesh to create the ear shapes before using a liquid fabric glue to attach the fur to the masking tape cap.
Not to bad. I wore the costume for Halloween at the Texas Renaissance Festival . Where it was a hit with everyone. From the young ...


To the awesome...

To other fans of the film...

So get out there and build something.

The second costume
This fall I decided I was going to give costuming a second go and so I started searching for a second character to recreate.


This time around I chose to go as Ash from the Wes Anderson film Fantastic Mr. Fox. (I'm sure you've seen it. RIGHT?) Ash has quite alot less going on so he was a little simpler to bring to life even though I ran into plenty of problems.
The first thing that I wanted to build was his whackbat. So I grabbed a fairly hefty oak plank and an oak dowel.

Using some wood glue and a good set of clamps I cut and laminated the wood together to create the basic shape. Next I used a hand plane to shape the sharp corners of the bat down to rounded edges (One day I hope to have the power tools to perform all these operations). Using a hole bore bit I dug out a spot for the handle and glued it in. For a bit of flair I bought a replacement table leg piece to put onto the end of the handle.
After a bit of sanding we hit it with some minwax wood stain.

The color looked good but there were a few places where glue had dripped onto the wood. I sanded these spots out and restained it. Once I had the color right I used some Sculpey to make the nobs that whacbats sport. I tapped a small hole for each one and using a small peg, to make sure they didn't fall off, I attached them along the outer edges of the whackbat. Then it was time for lacquer.

Not to shabby if I say so myself.
My first costume
Last year was my first real go at creating a costume. Unfortunately I don't have many shots of the overall creation.

The character came from the 2009 sci-fi film District 9. I learned quite a bit from the process. Most of the hard parts of the costume were built from plaster bandages overlayed with a self thickening liquid plastic from smooth on.

The hand was crafted from a rubber that I got through smooth on as well. Unfortunately during most of the work I did on this project I wasn't thinking of documenting the process.
First post
I had an old blog a long time ago that I never updated that was about (or was going to be about) my attempts at creating various costumes. That never got very far because at the time I wasn't really working on many costumes.
Now I'm working on several and I figured this would be the best place to keep a build log, tips, recommendations, and warnings for anyone who might want to see my stuff.
Subscribe to:
Comments (Atom)